Showing posts with label how to. Show all posts

Friday, 12 December 2014

Memrise - how to create your own "mem"

In Memrise's own words:

What is Memrise?

Memrise is an online learning community where one can learn almost anything in the world, entirely for free! Through just the right mix of science, fun and community, learning on Memrise is speedy, enjoyable and lasts.
Most people I know who have used Memrise love it. It's available both on the web and on mobile devices. The mobile app is still undergoing improvements as I write. I know because I'm helping them test their betas. ;) My recommendation is to use both.

Every so often, I create my own reading/listening activity based on current news and I usually include a lexical exercise. But, as we all know, retaining vocabulary is extremely difficult and most students forget the words they learn almost immediately after.

Since I had some time on my hands, I decided to create a course on Memrise based on these said activities. One of the strongest features of Memrise is their mems (basically, mnemonics) and although I've created a mem or two for each lexical item, my mems very often are just sentences showing how the word was used in the article of the activity.

I encourage students to make their own mems as, really, that's a good way of helping them remember the words, but it seems that many don't understand how it can be done. So, here's a short pictorial tutorial. ;)

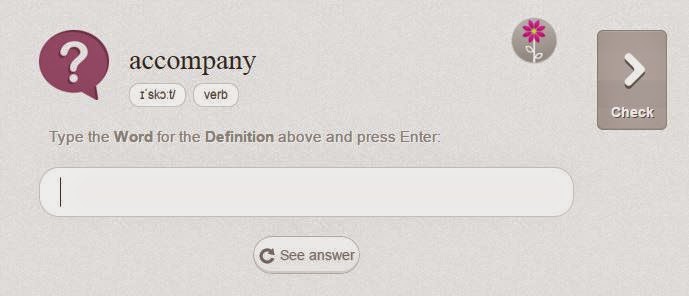
Say, you've gone into my course. You'll see something like this.

How to create a mem on Memrise

You may choose to review what you remember by clicking on Review, which will bring you to this screen.

How to create a mem on Memrise

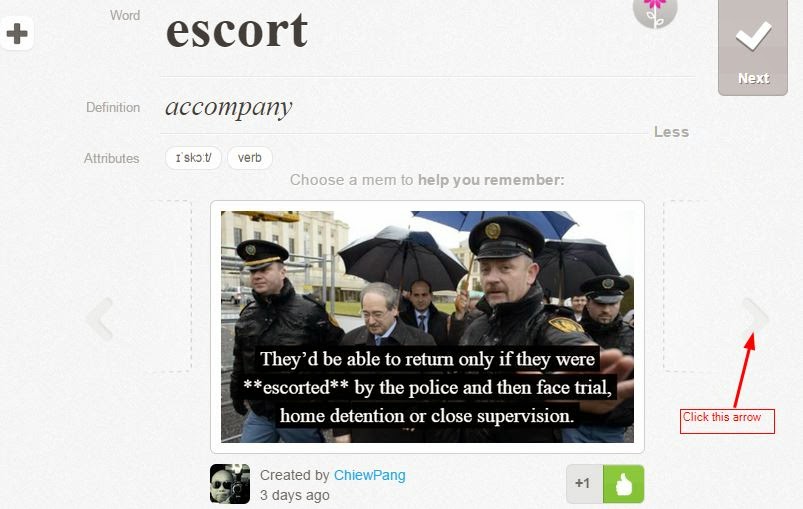
Clicking on See answer will bring you to this one.

How to create a mem on Memrise

Now, click on Choose Another Mem.

How to create a mem on Memrise

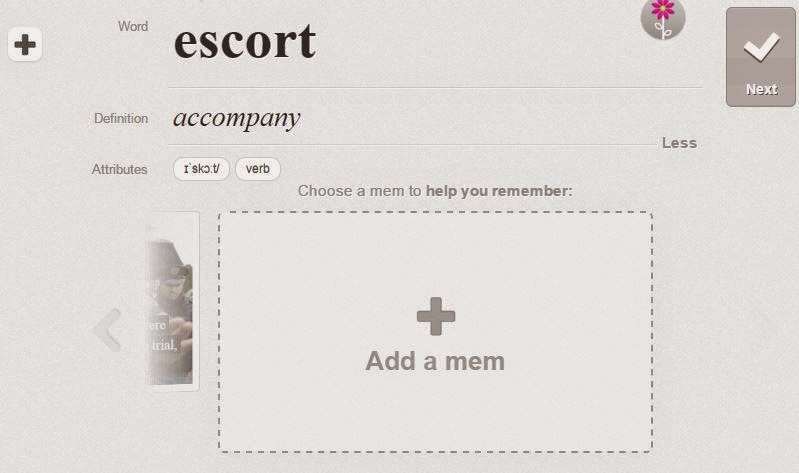
You'll see arrows to the side of the mem. Click the right-facing arrow and you'll see the next one. When there aren't any more, you'll see the following image. I know, at the moment, creating a mem isn't as straightforward as it should be. Hopefully, that will change in the near future.

How to create a mem on Memrise

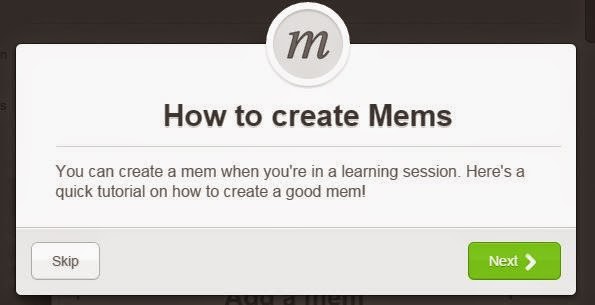
Before clicking on Add a mem, have a look at Memrise's tutorial on creating good mems.

How to create a mem on Memrise

How to create a mem on Memrise

How to create a mem on Memrise

How to create a mem on Memrise

How to create a mem on Memrise

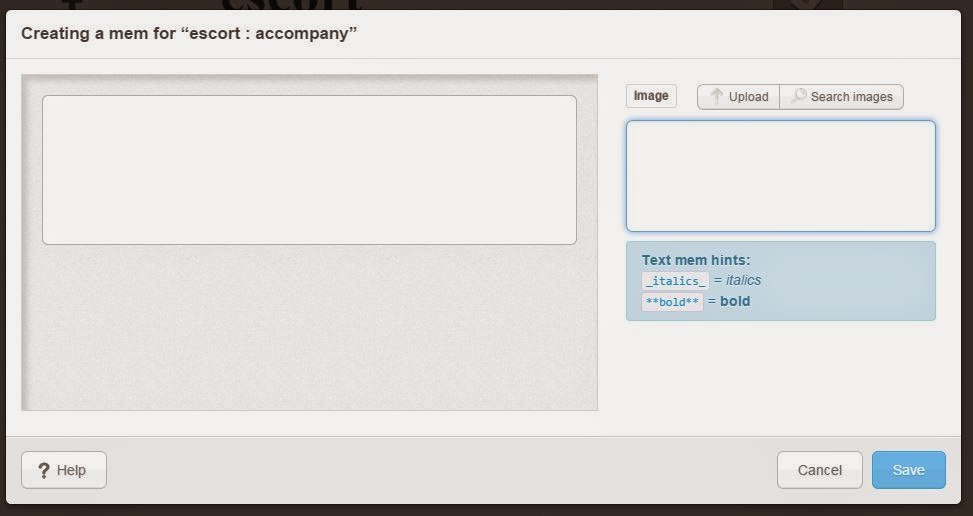
When you click on add a mem, this is what you'll see.

How to create a mem on Memrise

Write any key words you like in the search box and click on search images. When you find one you like, click on it and then save. If you don't want to use any image or you wish to upload your own, skip the search, which will bring you to this:

How to create a mem on Memrise

Type in your text. The bold and italic option only works without images. Don't ask me why.

How to create a mem on Memrise

Click save and you're done. You can modify your mem at a later stage if you like.

I look forward to seeing your mems! Feel free to voice any doubts you may have.


Friday, 25 April 2014

Don't be outfoxed. Foxit!

Several months ago I was ranting about a problem with my browser; it had frequent problems and I suspected that it had something to do with Adobe software incompatibility issues. PLN to the rescue, and Cherry Matthew mentioned that he'd stopped using Adobe Reader some while ago and had opted for something called Foxit instead. 

And there I was thinking that Acrobat was the only free pdf reader available! Silly me. After the usual barrage of Q&As, I decided to put it to the test. I might have tested a few others, but I honestly can't remember. Whatever the case, it was Foxit Reader which remains on the computer.

Originally, all I wanted was to have a PDF reader which wouldn't clash with my browser, and which was light and fast. But if you use pdfs as much as I do, then you may lament the difficulty of scrolling up and down pages, you may miss sticking Post-its or scribbling notes like you could do in books, and suffer the tediousness in keeping track of documents if you're in the habit of having several open at the same time, etc.

I, therefore, didn't take long to try out some of the tempting buttons on the toolbar and once I started using them, there's no turning back. I'll outline just some of them here. Incidentally, Foxit is also available on mobile devices. And, in case you're wondering, you don't need to have Foxit to be able to see the annotations; in other words, they can be seen by other readers.

Snapshot of some Foxit capabilities


Typewriter


Type directly onto the document. Great for writing answers on exercises.


Note


Pin a note. Unlike Post-its, these aren't likely to disappear! This and the typewriter function are probably the ones I use most. The great advantage is that it can be moved out of the document, so you can have notes on both sides of the screen, away from the original words/images. What you can't do is to edit individual words within the note; for example, if you wish to highlight some words or use a different font, you can't.

I've requested this function so I'm hoping Foxit can and will allow it. Another function I've requested is to be able to write phonetic scripts, something which isn't supported right now.


Highlight


For those of you who are fond of using markers, fret not! This one's especially for you. There are two places you can do this from - in the comment menu, it's on the left, and in the home menu it's towards the centre. You can also change the colour & opacity by right-clicking on your highlighted area, then choose properties.


Drawing


You can draw circles, squares, rectangle, polygon, you can draw lines or arrows, multiple lines or freeform.


Textboxes and Callouts


These have to be within the document but have the added advantage of giving you the ability to edit individual words within the box (see Note section above).


Pin an image


You may wish to include an image on the document. You can do this by using the Image Annotation on the right of the toolbar. To see the original size, however, you'll have to click on the Image Annotation button, right click on the image, choose properties. Go to Settings.


Bookmarks


Adding a bookmark is easy. You can use the functions on the navigation panel on the left, on the top toolbar in home menu, or Ctrl B. However, I find moving the bookmarks up or down somewhat problematic as Foxit has the habit of nesting the bookmark within where you drop it off. The way I get around this problem is to move it all the way to the top and then move it down again to where I want it.

There isn't a sort function either. To avoid these problems, remember that Foxit adds the new bookmark after the one you last clicked on. In other words, before you add a bookmark, click on the bookmark after which you want to add the new one.

Nested bookmarks on Foxit


Navigating the document


I used to find navigating on PDFs a messy chore on Acrobat. Foxit's hand function is wonderful - works like a touch screen - so much so that I often try to use it on Google Docs and feel disappointed when I realise that the capability doesn't exist there!

Alternatively, you can just use the standard page up/down or the arrow up/down for more minuscule movements.

Furthermore, Foxit allows tabbed browsing, so jumping from one document to another is a breeze; just remember to save your modifications although you will be reminded if you have made any unsaved changes.

Tabbed browsing on Foxit Reader


Printing/Sharing


Of course, you may not want to share all the annotations you've made on the document. You may want to share a document and your notes with a colleague or you may want to print some pages (without your comments) for your students. You have 3 options of printing: document, document & annotations and annotations only. Having a toggle function where you can make the annotations disappear would be great if you want to beam up, say, some exercises, and then toggle on the answers. I've also requested this feature.


Other functions


There are loads of other buttons you can play with. You can link to websites, insert video, copy texts and images, etc. Copying doesn't always work because of the nature of the pdf format. Having said that, it's certainly easier to copy on Foxit than Adobe! You can either select text or do a snapshot. If I managed to copy texts, what I usually do is to paste them onto Notepad and rectify any discrepancies.

Manual

For the official manual, click here.


Feedback


So, what do you think? Are you using Foxit already? If you are, what do you most like/dislike about it? If you aren't, what do you find most attractive about it?


Friday, 15 June 2012

A case for CPD and PLN...

ELT EFL ESL CLIL PLN CPD Resources, images, ideas
Photos by me. See more here.

Here's an example of how a seed is taken and planted with care many miles away where it soon grows into a pretty flower. This flowering stem is again taken some distance away, where it grows and grows and we now have a lush beautiful garden...

It all started with a comment I made in Scott Thornbury's post on iTDi's blog "How important is homework?" I'd first talked about it in The Dogme Diaries, but I don't suppose many people read that ;-)

I mentioned that the homework I set a class of adult teachers was basically three questions:
  • What have you learnt today?
  • What part of the lesson did you like or dislike in the class today?
  • What would you like to do in class next week?
A couple of months later, Alexandra Chistyakova wrote to say that she'd used the questions with her class of university students, and how well that had gone down. You can read about how she moulded my homework to suit her personality and that of her class here:


Then, a little while later, Barbara Bujtás read Alexandra's posts and decided to adapt it to her class of 3-year-olds! You can read about it here:


You can see the beauty of her work here:


So, if you're not involved in a PLN (personal learning network) or have not been convinced of it, I hope this little episode will serve to change your mind!

Alexandra and Barbara, you both rock!

Learn about continuing professional development here: http://www.scoop.it/t/continuing-teacher-development

Learn about the benefits of Twitter here: http://www.scoop.it/t/why-twitter-for-teachers


Monday, 19 March 2012

Grammarly Blogathon: How to be a "superb" writer

These helpful hints are brought to you in partnership with the Superb Writers' Blogathon by Grammarly grammar checker. Grammarly understands the importance of the written word.

ELT EFL ESL CLIL Writing skills how to be a superb writer

When Grammarly first approached me and asked if I would like to contribute a short post to the blogathon, my first thought was, “Mmm… so I’m a superb writer, am I?”

I know that not to be true, of course, although I have to admit that I do spend a lot of time mulling over words and sentences. I accepted their offer, the sucker that I am for such things, and here then are some of what I consider essential ingredients of good writing.

Grammar

Primordial. I’ll include spelling and punctuation under this section, too. Bad grammar makes reading difficult, worse, if your readership is likely to include teachers! A grammar checker, such as Grammarly, can help you sometimes, but you must know your stuff first, to be able to decide if the corrections are right or wrong. I’ve seen typical bad errors such as you’re-your and their-there-they’re even in professional writers’ blogs, and that’s just so embarrassing. These errors are common because the signal connecting the fingers to the brain sometimes fails, which is why it is imperative to proofread over and over again - see below.

Contentious issues such as split infinitives, or beginning sentences with a conjunction, are fine, in my opinion; if you know what you’re doing, they may mark your style and they are not necessarily wrong. But where mistakes are glaringly obvious or when they affect meaning, then they are definitely a no-no.

If you know that you make the same errors over and over again, it’s useful to compile a list of such errors so you can check your drafts against it. Here are some common ones:

  • subject/verb agreement
  • incomplete sentences (fragments can be all right, but you’ll have to be sure)
  • prepositions
  • tenses - be consistent
  • collocations (a good collocation dictionary is useful)

Vocabulary

It helps to have an extensive vocabulary. By this, I don’t mean you need to know “big” words which will send most of your readers diving into their dictionaries, but rather so that you don’t use the same words repeatedly. In any case, in these days of free online dictionaries and thesauri, it takes only a matter of seconds to look for alternatives. Having said that, there are times when words are repeated to create impact, especially in speeches. A good writer knows when to employ this technique.

Who’s your audience?

Knowing who your audience is important because it will (or should) affect how you write. Should you be writing in a formal or informal register? Longer or shorter sentences? Are you too technical or are you too condescending? Do you use too much jargon? Do you know what they are expecting to read? Is the language level appropriate? Will they find it interesting?

Style

“Style is a simple way of saying complicated things” -  Jean Cocteau

Bear in mind the pace in which we live. Most of us don’t spend much time on detailed reading, especially on the web. We mainly skim through lots of material until we find something that catches our eye, something that is of interest to us. So, be clear and concise. Are you saying something to the point or are you being excessively long-winded? Is your use of language and content correct? Is it easy to understand?

Organization

Is your material well organized? Is there variety in sentence and paragraph lengths? Does it flow smoothly? Have you made good use of strategic linkers?

Proofs

Proofread your output over and over again. Sleep on it. Read it again the next day. Read it aloud. I do this all the time because often when we read silently we miss certain things as the eyes seem to register what the mind wants to. Reading it aloud has always thrown up weaknesses I’d failed to spot while doing it silently. This is especially true with repetition.

Though by no means a comprehensive list, nor are these innovative ideas, I nevertheless hope that they will put you on the right path towards superb writing!

Friday, 20 January 2012

#ELTChat January Blog Challenge: How do you manage your bookmarks?

I've been meaning to write on something like this for some time, but like a lot of my ideas, it was gradually heading towards oblivion - when one tries to juggle too many balls, some of them are bound to fall, aren't they? - until I saw @tarabenwell's tweet on an #ELTChat blog challenge: What are the best methods for organising bookmarks?

Seeing that it was Tara who proposed the challenge, she was the first to take it on, and her favourite is Scoop.It. You can read about her ten reasons here.

Unfortunately, I'd missed the chat on the advantages and disadvantages of social networking for language teachers, but I saw some of the chatters' favourite bookmarkers here.

If you're reading this, you are probably one of those who finds it increasingly challenging to be able to read everything you would like to, and, no doubt, you spend more time skimming than reading, and if you're quite organised, you might bookmark some for archiving or for reading later.

Well, that's what I do. I used to use the browser's bookmark feature until I had just so many bookmarks that I hardly looked at them unless I was trying to find a website I'd forgotten.

I'd also used Google Reader, but I found I stopped going through the list after a while. I'd also dipped my fingers in Delicious, Diigo, Livebinders, but none of them lasted very long for me.

I like Scoop.it, and I can understand Tara's choice, but, unfortunately, it only allows five topics for the free version. Scoop.it is fabulous, and I use it, but not for day-to-day bookmarking, not for sifting through all the stuff I want or may want to read.

So, what do I use? Which are my current favourites?

For indexing useful ELT resources, apart from Scoop.it, I use my Useful Resources page; I categorise them under meaningful headings, its weakness being I have to do it manually. Still, I think it's a good place to have them for myself and to share with others.

I'm scratching the surface with Evernote, but it has so many possibilities that I'm afraid it may get so overwhelming and may follow the footsteps of the others I've used. I'm trying not to put too much stuff on it, but just my to-do list alone threatens to fill up pages, and what I don't see I tend to forget!

I still use my Chrome bookmarks, especially the bar, where I put things I'd like to get to easily. When they are no longer required as frequently, and if I remember, I remove them. I also use the option where Chrome reopens all previous unclosed tabs upon reboot, but this gets cluttered up pretty quickly, so I put it all in a folder called 'Pending' until...

A few weeks ago, I discovered this new tool, which is just perfect as a complement to the others I'm using. I tweeted about it, but none of my followers seemed to have pick up on it.

It's called Read It Later, and claims to work in your tablets, mobiles, browsers, and more. I've only been using it on my Chrome browser. It offers the all-important one-click button on your bookmark bar: click it and that page gets filed on your read-later list. When you've finished, tick it off and it disappears from the list. The tool's getting a facelift, and below I've included two different ways of looking at your list.


So, there you have it. Yes, I cheated - I didn't choose one, but these are what I'm using at this moment. To sum up:

1. Read it Later: used mainly for pages I intend to read in the short term. However, I noticed that the list has extended to two pages, which means I've slacked!

2. Evernote: I pile up my things-to-do here. I'm starting to bookmark some web pages here, too, so it could very well be where I 'archive' them after I ticked them off #1.

3. Chrome bookmarks: I don't close the tabs of pages I haven't "finished with" so that they reopen automatically the following day. When they stay too long, they get moved to #1.

4. Scoop.It: The five topics only means that it is the first to go if I had to make a choice, much as I love it. I've used up the five topics - I didn't know about the limit when I started. Perhaps I might have done it differently had I known, but I don't feel like changing now. These are pages I share with others.

5. The other place where I can readily share my bookmarks is my Useful Resources page. Added 22/01/2012: I'd forgotten to mention that I follow so many blogs that it does get out of hand, so I created a blog to follow their feeds; when I have some spare time, or I'm looking for a person's blog and can't remember what it's called, I go to http://chiewpang.blogspot.com/ Take a look!

So, what are the tools you use for bookmarking? How do you organise the information bombarding us from all angles?

Thursday, 12 January 2012

Holding a camera: Is the right way wrong?


It is funny that James should have found it funny, but, he was, of course 100% right (James was referring to the photos I published in the post Shoot to CLIL. As I told him in my immediate tweetback, the lanyard was actually on the camera taking the photo of "the right way". Just like him, I always use a lanyard: for a small camera, I twist it around my wrist, and for a bigger camera, I have it around my neck. The lanyard is not only to avoid dropping the camera, but to add stability, even if it's only psychological. So, here it is, then, the right right way, with the cameras the other way around! :-) Thanks, James!


Sunday, 8 January 2012

Shoot to CLIL

Well, with photos being much the flavour of the moment (see Project 366), I think it's just apt that my guest post for the ELTPics blog, "Take a Photo and..." was published yesterday.

That post, unlike this one, is somewhat lengthy, and is divided into two parts. The first part is devoted to a lesson idea as the blog is, after all, a source of ideas on how to take advantage of photos in the classroom.

The second part, however, is a "tutorial" by an amateur (me) for amateurs where I attempt to pass on what little knowledge I have of photography to readers of the blog, especially the contributors and would-be contributors to ELTPics, where I explain some of the tips and tricks on how to make the best out of your little automatic camera.

You can read all about it here.

Wrong way
Right way

Saturday, 12 November 2011

How to navigate around this blog?

As part of the prize package for winning Grammar.net's Grammar Blog of the Year 2011, they have designed an infographic for me - thank you, team! Since I no longer have the dynamic tree menu, I thought it a good idea to have an infographic showing how to navigate around this blog.

There is also a bigger size available for download, should any school wish to print it for their classroom or computer lab.

This infographic will also be available from the page "Finding your way around this blog".

Do you like it?
The Best Grammar blog of 2011

Infographics - How to navigate around this blog

To see the full-sized version, click here
You can also see  the full-sized version here, if the above link doesn't work well for you.
If you would like to download a poster-sized (4725 x 12072 px) version for your classroom, click here.

Wednesday, 12 October 2011

How to insert an image from Flickr to your blog/website

First and foremost, if an image is protected by copyright, you won't be able to download nor use it. In my Useful Resources page, you can find several links to sites where you can obtain copyright-free images. One of the most useful sites for teachers is the ELTPICS group in Flickr, where images are photographed and uploaded by teachers.

Each week, on Twitter, teachers are invited to send their own pictures for a theme (although they can upload photos for the other sets, too).

There are several ways you can search for an image. If you enter on the above link, you'll find the latest photos which have been uploaded, and on the right of the page, you'll find the latest sets. If you wish to look at all the sets, you can click on this link. You can also search by tags.

If you want to look for a particular teacher's photos and know his user name, you can use the search box. Don't forget to select "eltpic's Photostream":


When you've found your image, it will most likely be a thumbnail. Click on this to see a larger version. If you then want to use the image, remember to mention where you got it from! Now, you'd need the html code to insert it to your blog or website.


As you can see from the image above, you'd need to click on the Share button and select 'Grab the HTML/BBCode". The HTML Code will pop up.


Select the size you want, and copy the code. If you just want the url, copy only the part which is underlined in red. You may need to copy and paste it somewhere else first, such as Notepad, before you can do it.

Wednesday, 25 May 2011

Fantastic new tool for annotating web pages

Scrible (with one 'b') is a fantastic tool for both students and teachers, fantastic if you surf the Net a lot, especially for research. Imagine if you could do to the web page that you're reading what you do to your research material. Well, with Scrible, you can. It's a great piece of online software which allows you to scribble notes onto the web page itself, highlight sections, save the edited page in your library for use later, and share it with your friends. They'd need to sign in first, though. (And, no, I don't get paid for saying all this, in case you're wondering).

Your annotations are automatically added to a table of keys (legends), to which you can add your own descriptions, for example, you could assign red notes as URGENT, blue notes as INTERESTING, yellow highlights as NEEDS CHECKING, etc.

The free version of Scrible, at the moment, gives you 125 megabytes of space for you to save your files.

If you'd like to see an example of an annotated page, I've been testing it on this blog itself, providing instructions on how to navigate around it. You can see it here. (You'll have to sign up first - it's free). You can move the notes around simply by clicking and dragging (in case there are overlapping notes). Be warned that the notes are sometimes moved a little after saving, so they may not be exactly where you had them originally.

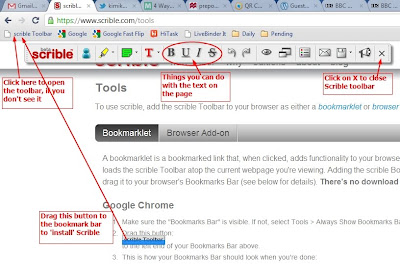
To start using it is really easy. No installation is required. Go to https://www.scrible.com/tools. You can add the Scrible toolbar as a "bookmarklet". Just click and drag the button which says "scrible Toolbar" to your bookmarks bar as shown in the image below.

If you have done it successfully, you should now be able to see "scrible Toolbar" on your bookmarks bar. You can click and drag it to wherever you want on the bar.

To begin, click on this, and after a few seconds you'll see a floating Scrible (I wish they'd spelt it with 2 b's!) toolbar.

You're now ready to start using it.

ELT EFL ESL CLIL Resources, Games, Activities: Anotating web pages using Scrible

To add notes, just click on the notes icon, and you'll see the icon following your mouse. You'll find that Scrible starts to highlight the texts where your mouse moves to. Click again when the text you want your notes to refer to is highlighted. A text box should appear near your selection. Write your notes, and repeat process to add more notes.

ELT EFL ESL CLIL Resources, Games, Activities: Anotating web pages using Scrible

The other features, such as highlighting, changing fonts, etc. work the same way. Your files are saved automatically, but you can save it under a different name - just click on the floppy drive icon as shown in the image below. To share the annotated file with your friends, click on the envelope icon.

ELT EFL ESL CLIL Resources, Games, Activities: Anotating web pages using Scrible

Since Scrible saves your work automatically, check your library often to make sure there are only stuff that you want, and delete the rest.

Scrible is in public beta stage, so if you find problems, or have any suggestions for improvement, just let them know.

What do you think of Scrible? Please leave your comments below.

Related posts:

Friday, 13 May 2011

How to create an interactive mind map for use in the classroom, Mark II

When I published this the first time, Blogger had a crash, which lasted for two days. They had to delete some posts (including mine), but subsequently restored them. I'm not sure if the restored version is trustworthy, so I'm re-publishing this article. I also decided to add more ideas on how to use mind-maps as I know a lot of teachers just want all their stuff served on a silver platter! ;-)

I have just discovered this nifty mind-mapping tool, so I decided to put it to a quick test. It's called Bubbl.us.There are lots of things you can do with it and it's user-friendly, so it's quite easy to use. In any case, if you're in doubt, they have a comprehensive help page. If you still have problems, just write a comment below or email me.

You don't need to have an account with them to start using it. Click start, and begin clicking and typing! Among the things you can do are undo (but not redo), copy & paste, drag, change colours and size of bubbles, and linking manually.

When you've finished, you can print it.

However, if you have an account - it's free and easy as pie to set up - you can save your mind map, and share it by linking or embedding it on your own site.

I won't go into all the details as they do it better on their help page. As an example, I did a map on Asking Questions, first seen on Teaching students to ask questions, and embedded it here. To enlarge, click on the + sign on the top left, or try the scroll knob on your mouse.

There's just a slight niggle I have about it, though. When you start the tool, you may get, like I did, Adobe Flash Player asking permission to store information on your PC. I'm not sure why, so I refused it permission, but, as you can see, it didn't prevent me from creating a mind map.

So, what do you think? Do you like it?

Here are some ideas on how you can use mind-maps:

  • Use it to teach pronunciation: you can do phonetics (see example of partial mind-map below), rhyming words, etc.
  • Pronunciation of the ending of regular past simple
  • Spelling rules, for example, plurals (see my post on plurals)
  • Irregular past tenses (group similar verbs, e.g., grew-grown, flew-flown, knew-known)
  • Get to know each other by doing a personal mind map (hobbies & interests - past & present, family, places travelled, etc.). Students can do it at home, then in class, beam it up and have them guess who the map belongs to.
  • Group tasks. You can also map the tasks first, and the students decide themselves which tasks they prefer.
  • Phrasal verbs
  • Idioms
  • and the most common usage - vocabulary. Encourage them to do their own at home. You can review them at random in class, and brainstorm additions to their lists.
Some people will say that digital mind maps defeat their original purpose, that each map is individualised: each one does it in their own way, the crazier it is, the better they will remember what was written. Well, if they prefer, they can print it out, and then add their own illustrations, for example.

If you only have 1 computer in class, you can make the mind-mapping a whole-class activity, but if there are more, do it in groups. Then, you can compare them and get the students to bounce ideas off each other.

 If you have other ideas on how to use mind maps in class, why don't you share it with us?


Related posts:

Thursday, 21 April 2011

Tweeting is for the birds: Hockly vs Waters, IATEFL 2011 Brighton


This, along with the PechaKucha night, must have been the highlights of the IATEFL 2011 Brighton conference. The motion for the ELT Debate was 'Tweeting is for the birds, not for language learning', with Alan Waters speaking for the motion, and Nicky Hockly, against.

Here is an opportunity for those who haven't had the chance of watching a live debate in action to do so. The format of the debate differs slightly from the system I have been advocating for use in the classroom, but the essence remains the same.

Listen out for key points in debating:
  • Language style
  • Rebuttal
  • Support (quotes, statistics, analogies, case studies, etc.)
  • Clarity & logic
  • Organisation
  • Expression & delivery
So, watch this entertaining debate, and I hope it will inspire you to hold one of your own in your class/school. Please read the following:

Related posts